


I will explain to you today how to execute an Azure Automation Runbook through an ASP.NET website who is stored on a free Azure WebApp.
To do this, I will use Webhook from the Azure Automation Runbook. I used this article to understand how it works.
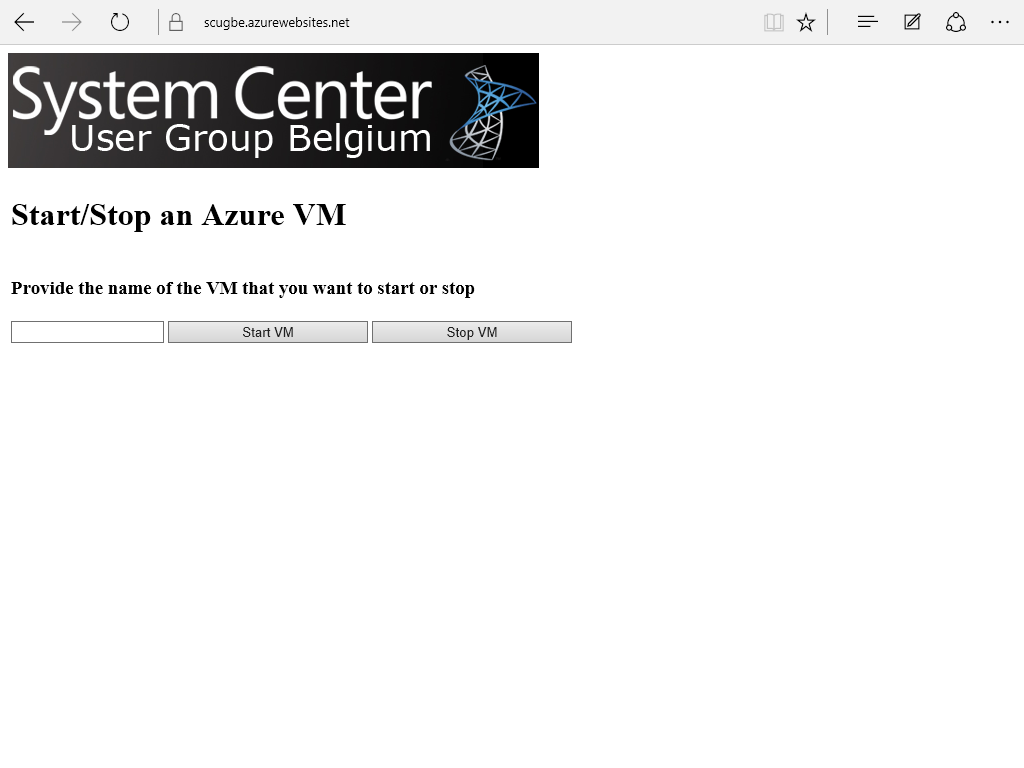
In my example, my website will give the possibility to an employee to start/stop a VM in Azure.
Create a new PowerShell Runbook with the name Connect-AzureSubscription.ps1 and the following script:
| $Cred = Get-AutomationPSCredential -Name ‘SvcAccountAdmin’ Add-AzureAccount -Credential $CredSelect-AzureSubscription -SubscriptionName “Your_Azure_Subscription” |
To start, create 2 new runbooks in Azure Automation. I will call them Start-AzureVM and Stop-AzureVM. They will have the following scripts:
Start-AzureVM:
| param ( [object]$WebhookData )if ($WebhookData -ne $null) {$azureVMName = $WebhookData.RequestBody.\Connect-AzureSubscription.ps1$azureVM = Get-AzureVM | Where-Object {$_.Name -eq $azureVMName} Start-AzureVM -Name $azureVM.Name -ServiceName $azureVM.ServiceName Write-Output “The VM $azureVMName is now started”} else {Write-Error “Runbook mean to be started only from webhook.”} |
Stop-AzureVM:
| param ( [object]$WebhookData )if ($WebhookData -ne $null) {$azureVMName = $WebhookData.RequestBody.\Connect-AzureSubscription.ps1$azureVM = Get-AzureVM | Where-Object {$_.Name -eq $azureVMName} Stop-AzureVM -Name $azureVM.Name -ServiceName $azureVM.ServiceName –Force Write-Output “The VM $azureVMName is now stopped”} else {Write-Error “Runbook mean to be started only from webhook.”} |
When they are created, go to the Start-AzureVM runbook and click on Webhook. Give a name, choose if you want to enable it or not, choose the date when this webhook will be unavailable and finally, copy the URl and stored it in a safe place. This is very important, because after you clicked on OK, this link will disappear:

On the Parameters part, just click on OK:
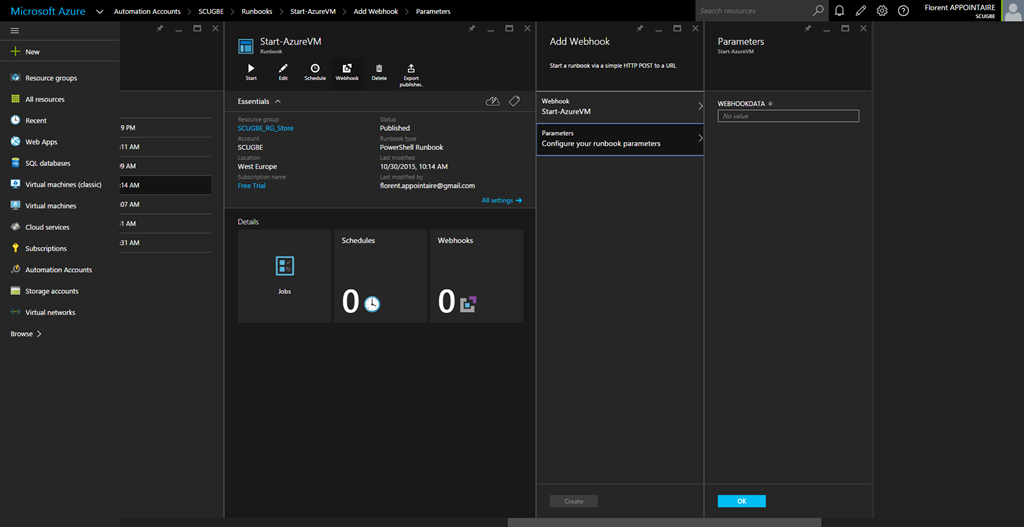
Click on Create to create your webhook:
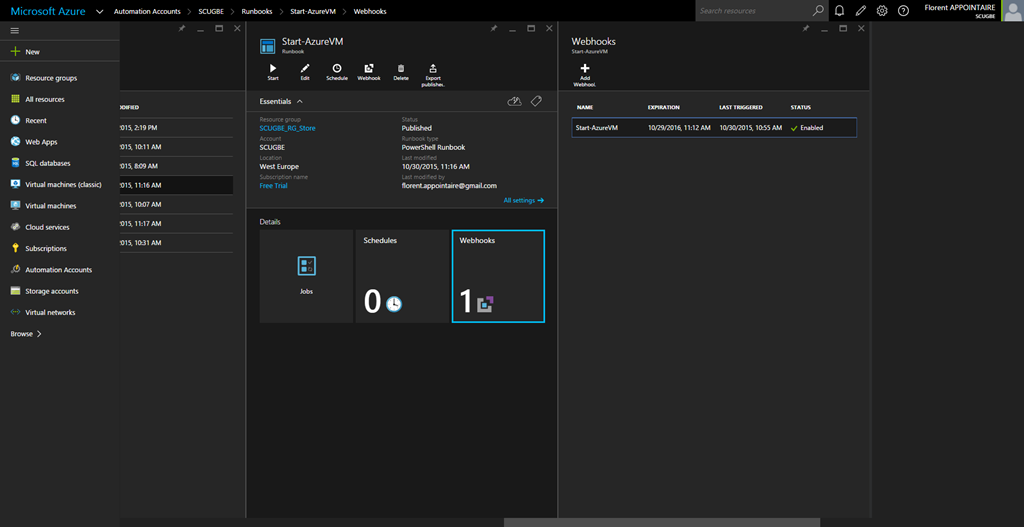
Do the same for the Stop-AzureVM runbook.
It’s now time to create the ASP.NET application. In Visual Studio, choose to create a ASP.NET Web Application with an Empty template. After the creation is done, add a new Web Form page. I will name this page Default.aspx. Paste the following code on this page:
| <%@ Page Language=”C#” AutoEventWireup=”true” CodeBehind=”Default.aspx.cs” Inherits=”StartStop_AzureVM.Default” %><!DOCTYPE html><html xmlns=”http://www.w3.org/1999/xhtml> <head runat=”server”> <title>Start/Stop an Azure VM</title> </head> <body> <form id=”form1″ runat=”server”> <div> <img src=”Sources/SCUGBE.png” alt=”SCUGBE”/> </div> <div> <table> <tr><td><h1>Start/Stop an Azure VM</h1></td></tr> <tr><td><h3>Provide the name of the VM that you want to start or stop</h3></td></tr><tr> <td> <asp:TextBox ID=”ServerName” runat=”server” TextMode=”SingleLine”></asp:TextBox> <asp:Button ID=”Start_VM” runat=”server” Text=”Start VM” Width=”200″ OnClick=”StartVM_Click” /> <asp:Button ID=”Stop_VM” runat=”server” Text=”Stop VM” Width=”200″ OnClick=”StopVM_Click” /> </td> </tr><tr> <td> <asp:Label ID=”ConfirmationMessage” runat=”server”></asp:Label> </td> </tr> </table> </div> </form> </body> </html> |
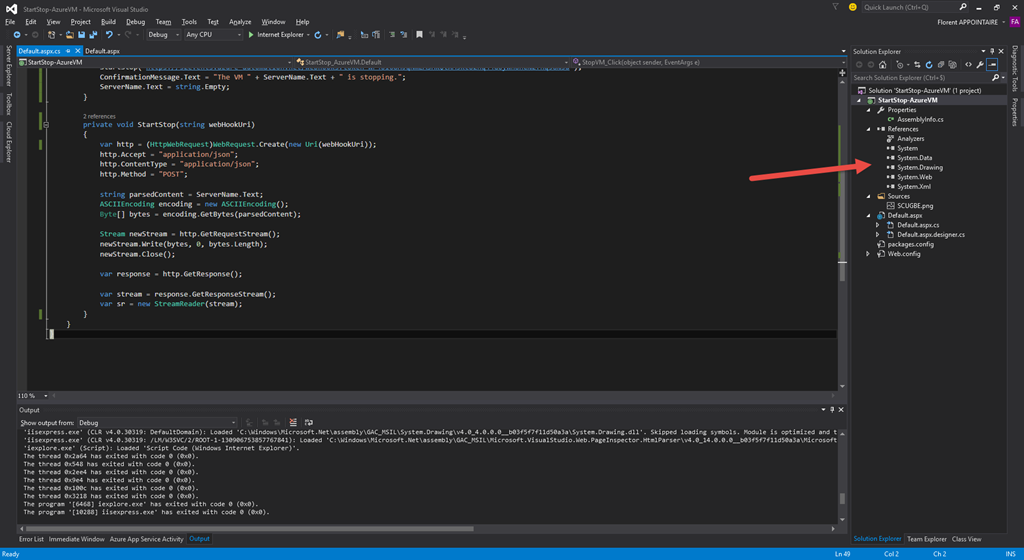
This page will give you a TextBox with 2 buttons, depending on your need. You will need the following references in your project to execute the next code:
- System
- System.Data
- System.Drawing
- System.Web
- System.xml
Open the Default.aspx.cs file and paste the following code:
| using System; using System.IO; using System.Net; using System.Text;namespace StartStop_AzureVM { public partial class Default : System.Web.UI.Page { protected void Page_Load(object sender, EventArgs e) {} protected void StartVM_Click(object sender, EventArgs e) { StartStop(“https://s2events.azure-automation.net/webhooks?token=”); ConfirmationMessage.Text = “The VM ” + ServerName.Text + ” is starting. Wait few minutes before trying to connect to it.”; ServerName.Text = string.Empty; }protected void StopVM_Click(object sender, EventArgs e) { StartStop(“https://s2events.azure-automation.net/webhooks?token=”); ConfirmationMessage.Text = “The VM ” + ServerName.Text + ” is stopping.”; ServerName.Text = string.Empty; }private void StartStop(string webHookUri) { var http = (HttpWebRequest)WebRequest.Create(new Uri(webHookUri)); http.Accept = “application/json”; http.ContentType = “application/json”; http.Method = “POST”;string parsedContent = ServerName.Text; ASCIIEncoding encoding = new ASCIIEncoding(); Byte[] bytes = encoding.GetBytes(parsedContent);Stream newStream = http.GetRequestStream(); newStream.Write(bytes, 0, bytes.Length); newStream.Close();var response = http.GetResponse();var stream = response.GetResponseStream(); var sr = new StreamReader(stream); } } } |
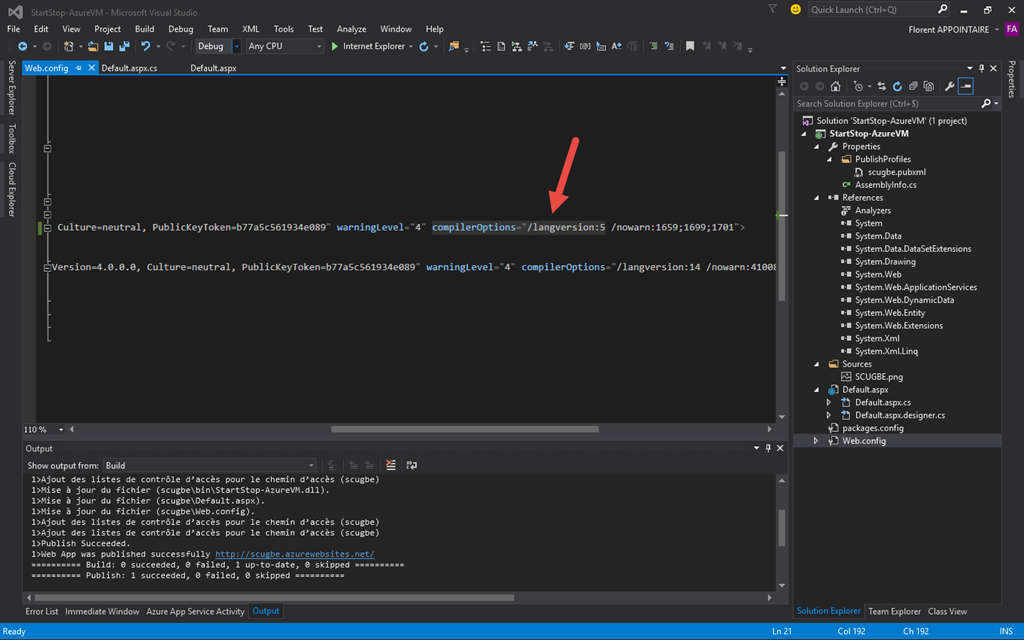
In StartStop call, replace by the values that you copied during the webhook creation. Depending on which button you will click, you will call the function, with the right URL webhook, to contact the right runbook. Open the Web.config file to modify a parameter that causes an error in Azure Website. Modify thecompilerOptions=”/langversion:6 by compilerOptions=”/langversion:5. This is corresponding to your framework compilation version:
You can now build the project. You will be able to see this: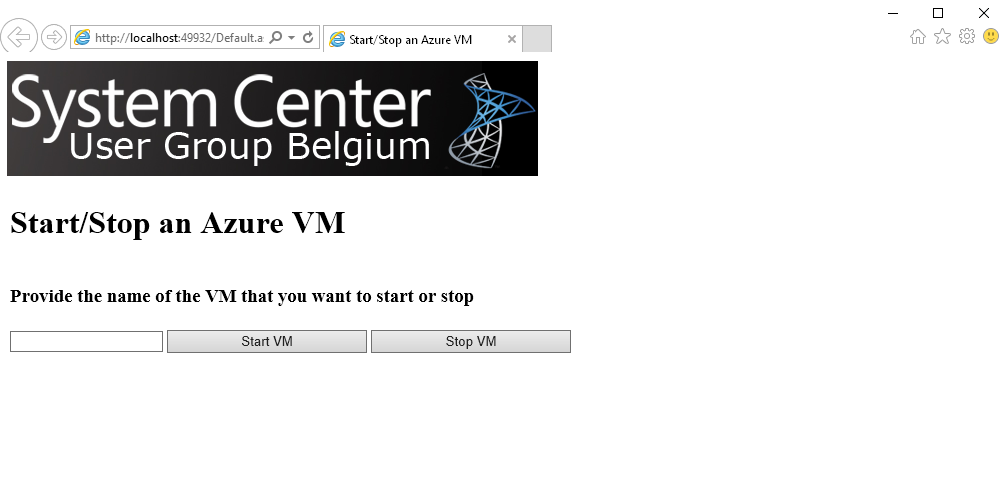 Our Website is now ready. We will create a new Website, based on a free plan. On https://portal.azure.com open Web Apps and click on Add. Choose a name for your website, and, on the App Server Platform, create a new App Service. I used a free pricing:

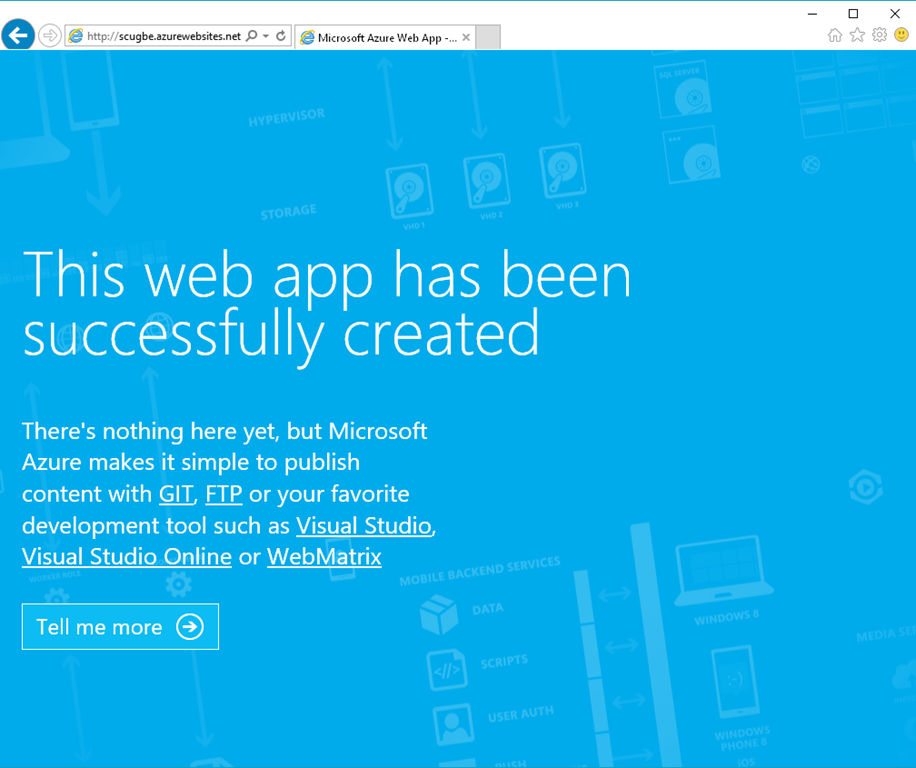
I can now navigate to my new URL:
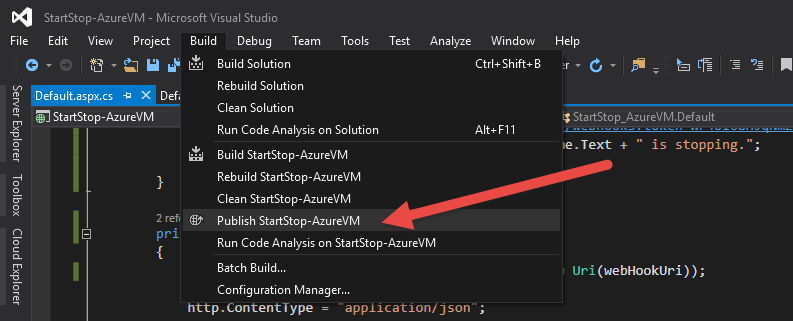
Now that my website is available, I will deploy my custom website on it, through Visual Studio. On Visual Studio, click on Build > Publish …:
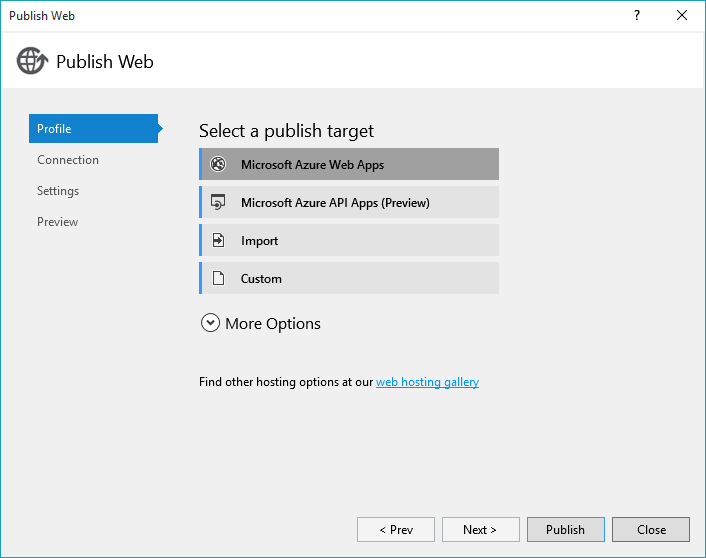
Choose Microsoft Azure Web Apps:
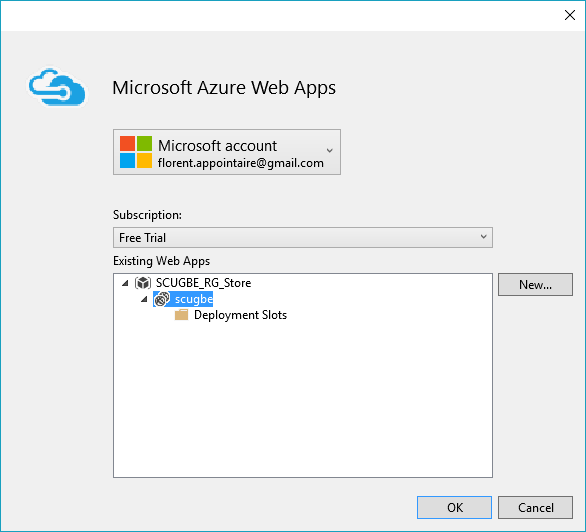
Log on with your Azure Credentials and choose the web apps where you want to deploy the web site. Because I’m in free version, I can’t use multiple deployment slot (prod/dev for example. This feature is available from Standard plan):
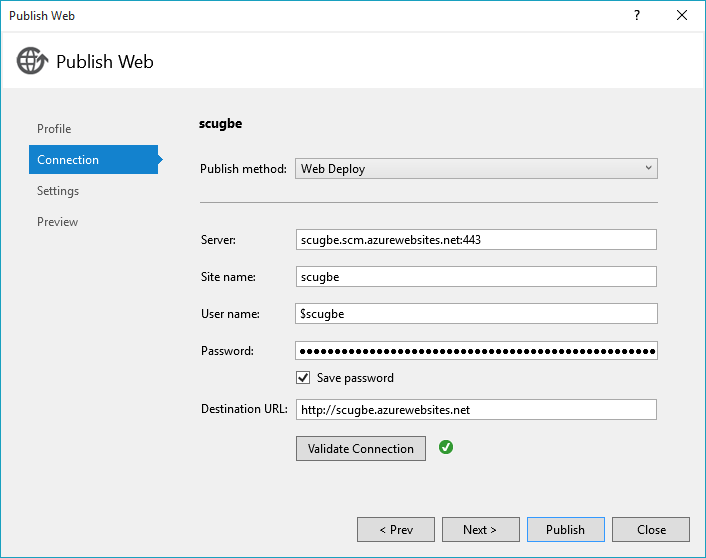
You can validate the connection:
My website is now deployed on the Web App: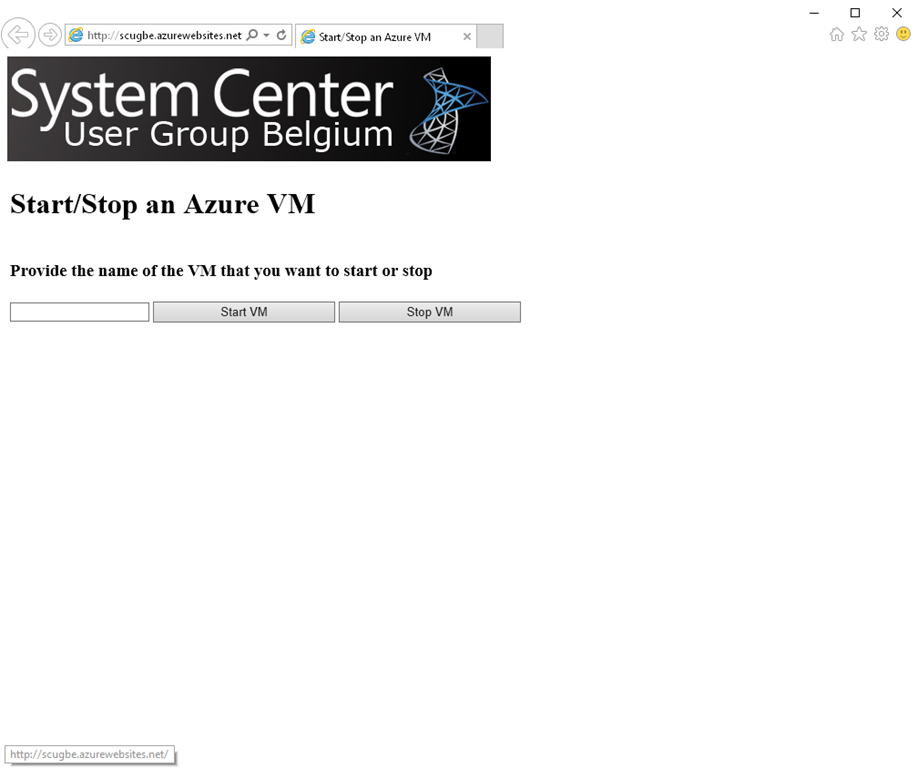
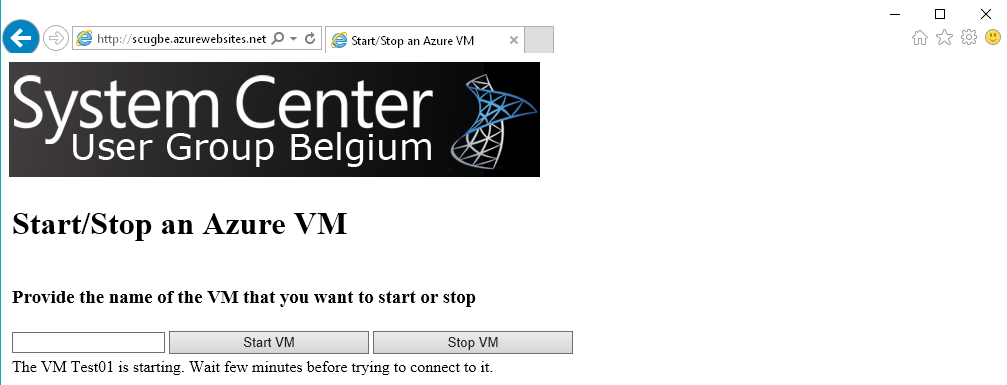
If I try to start a VM, I will have this:
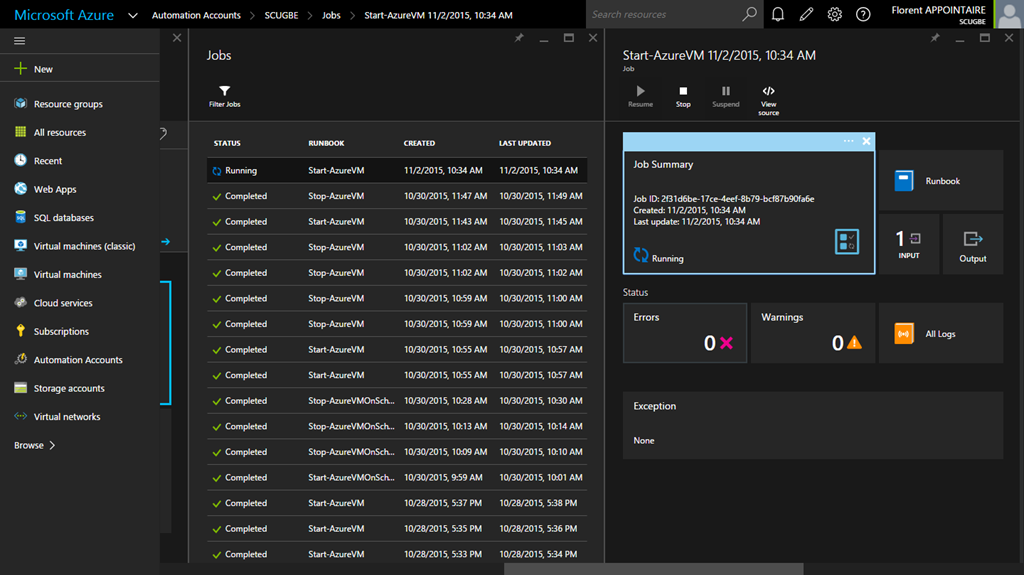
The Automation job is directly started:
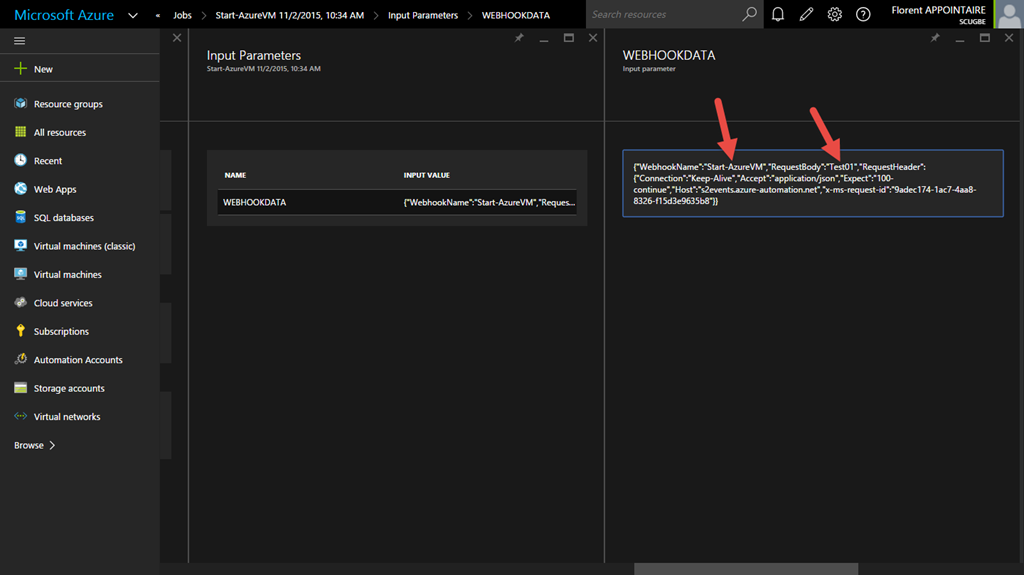
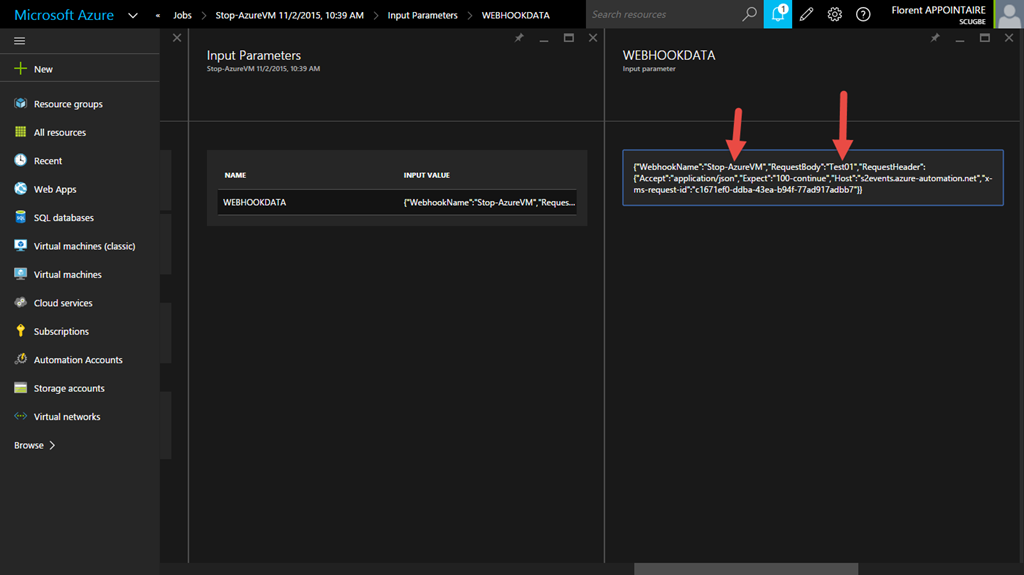
If you go in the Input part, you will see which runbook is called with which parameter:
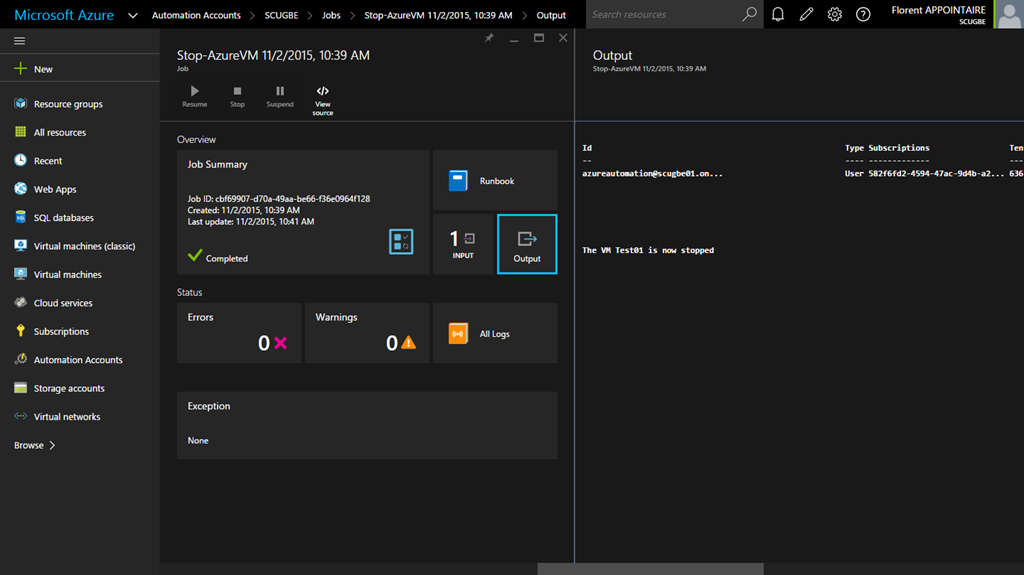
The job is now completed and the VM is starting:


And if I stop the VM: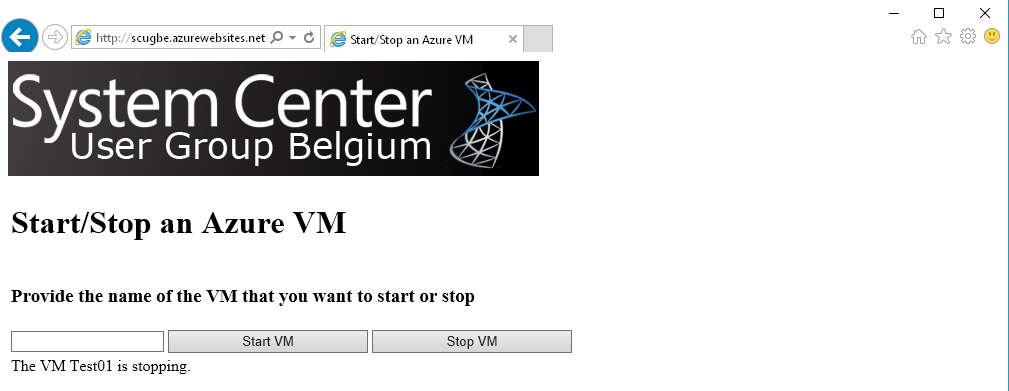

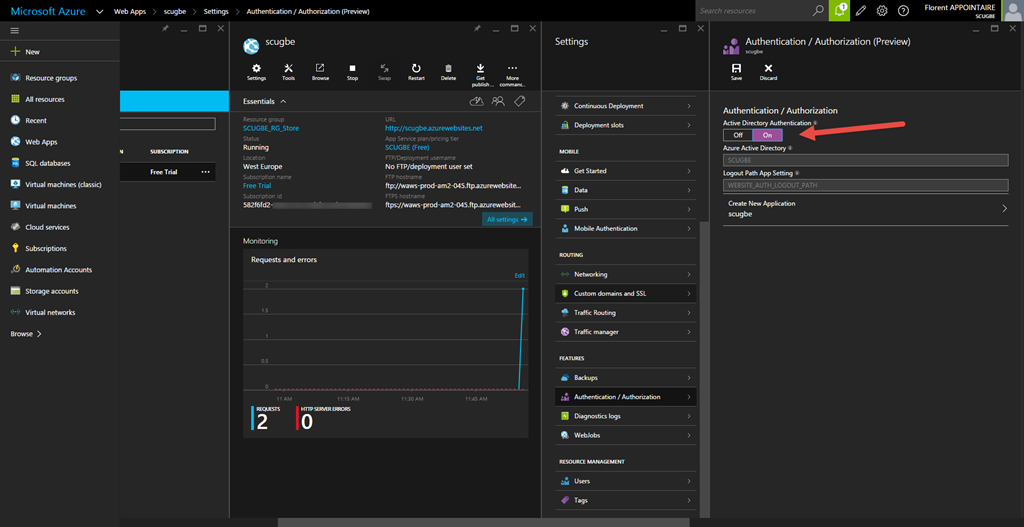
Because this website is public, I will activate the Azure Authentication. On you Web App, in the Authentication / Authorization part, choose ON and select a new application and click on Save:
Navigate to your website. You will be redirected to the login page:

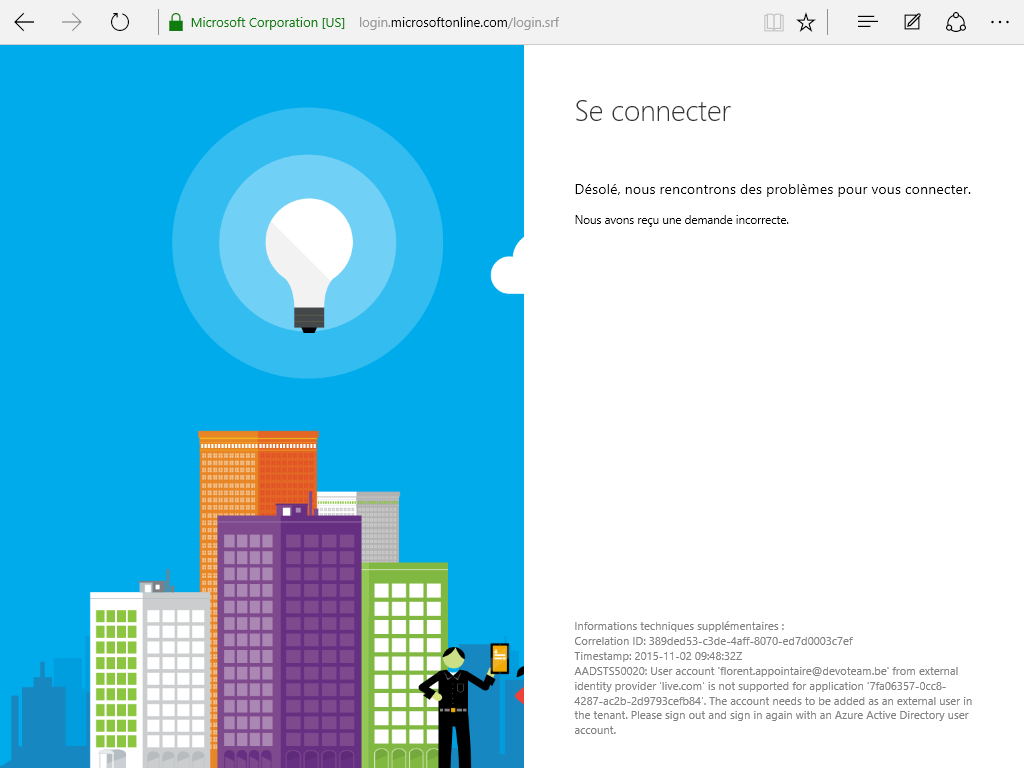
I tried to connect with an account that is not present in the Azure AD and I had this error message:
I logged out and try to connect with an account that is in the Azure AD and the web page is showing correctly:
I hope this article will help you 🙂
