

Extend Active Directory to Microsoft Azure is a common scenario when you implement hybrid cloud. For example, protected VM with Azure Site Recovery may need access to Active Directory even if On-Premise datacenter is unreachable. You can also extend your Active Directory to Azure when you use production workloads in Azure VMs to avoid to implement a new forest or to avoid to use the VPN connection for all Active Directory workloads. In this topic, we will see how to extend the Active Directory to Microsoft Azure.
Architecture overview
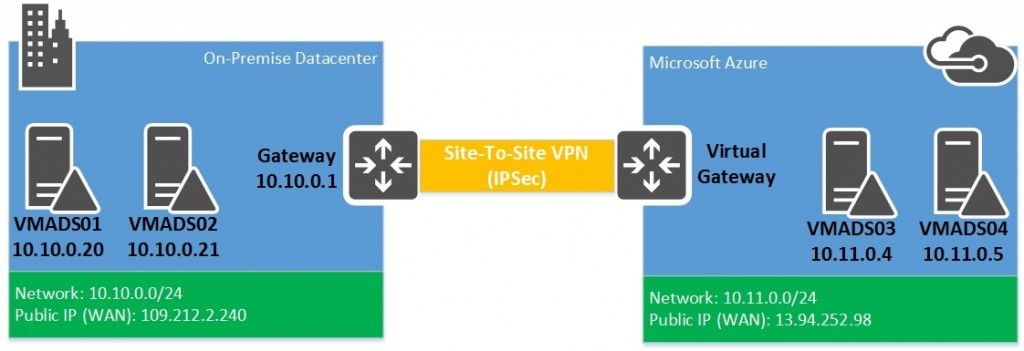
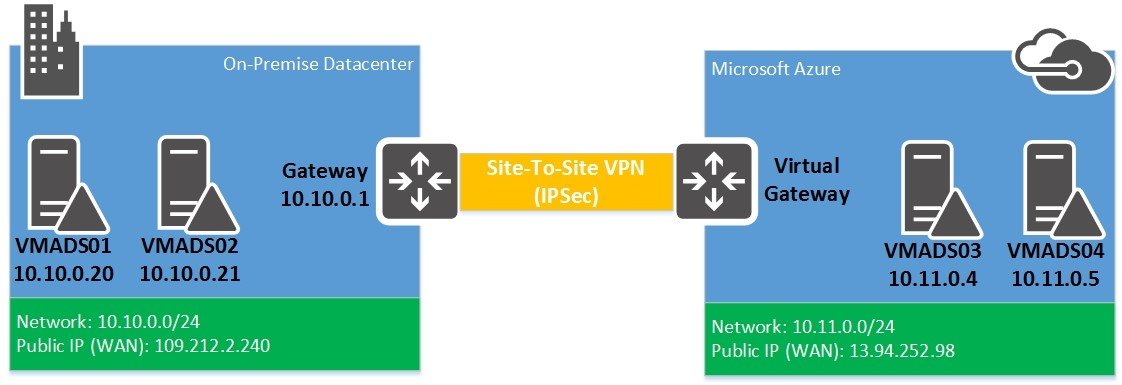
Currently I have an On-Premise datacenter with two domain controllers which host the int.homecloud.net directory. The network subnet is 10.10.0.0/24. In the Microsoft Azure side, I will deploy a Virtual Network with a subnet 10.11.0.0/24. Two Azure VM will be deployed in this network.
Then I will implement a Site-To-Site VPN based on IPSec to connect my datacenter to Virtual Network hosted in Microsoft Azure. Then I will add Azure domain controllers to my domain.
Prerequisites
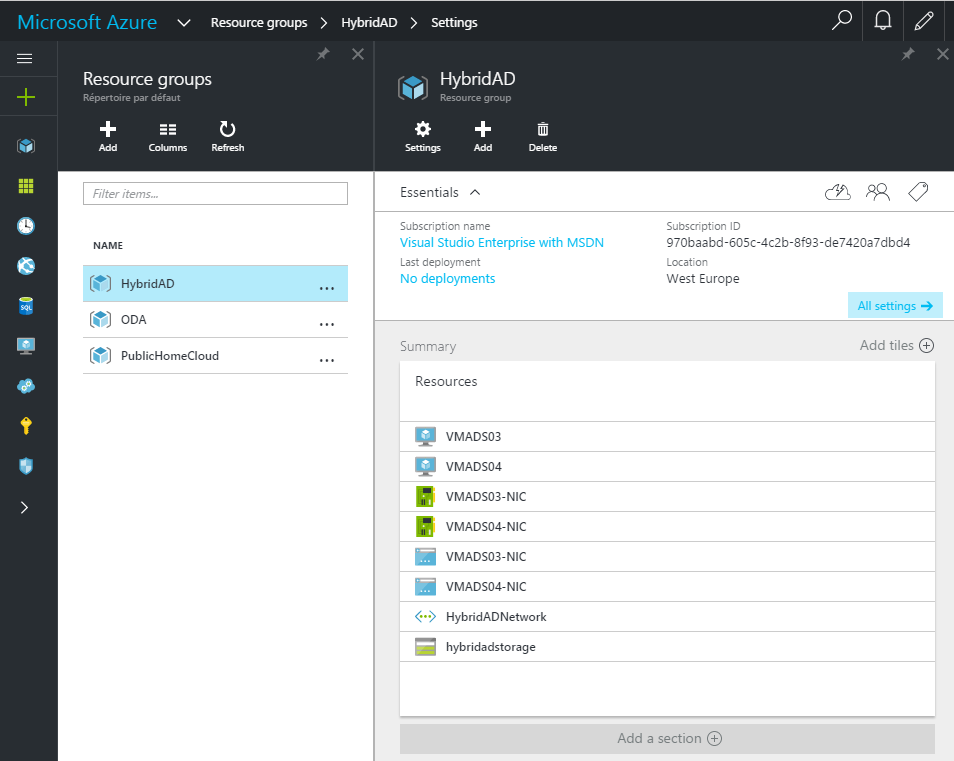
To deploy this lab, I have created a resource group called HybridAD with:
- A Storage Account called hybridadstorage (Local Redundant Storage)
- A Virtual Network called HybridADNetwork with a subnet 10.11.0.0/24.
- 2x Basic_A1 VM with an IP in 10.11.0.0/24 network (static IP) and a public IP
In On-Premise datacenter, I have two domain controllers already configured to host the int.homecloud.net domain.
Configure the Site-to-Site VPN
First of all, we have to connect the datacenter to virtual network in Microsoft Azure. First of all, I add the gateway subnet from the virtual network settings. In subnet settings, just click on + Gateway subnet.

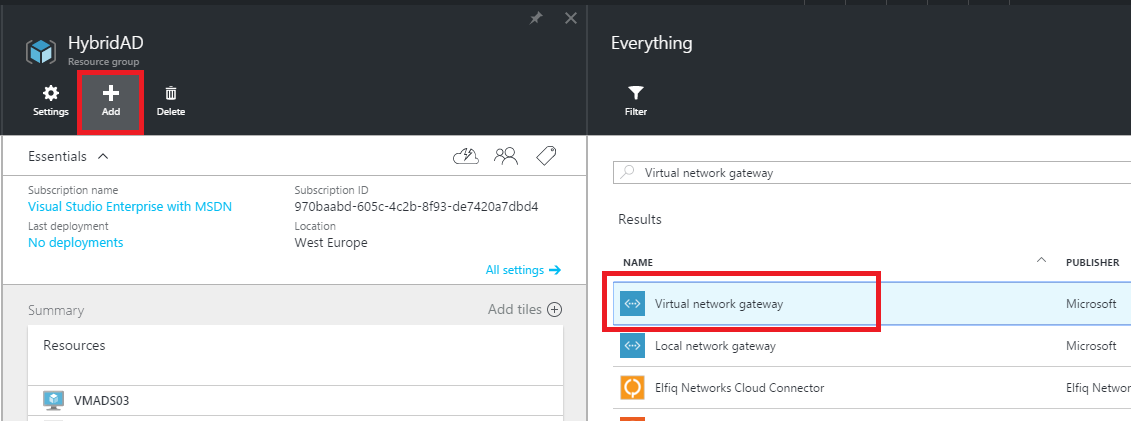
Once the gateway subnet is added, you can open the marketplace and look for Virtual Network Gateway.
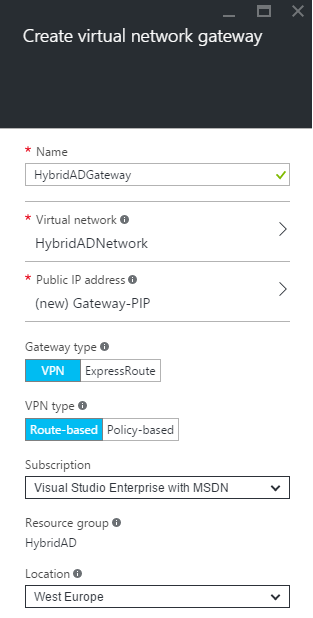
Then set the network gateway settings. Select your virtual network and create a new Public IP Address as below. Then choose the Gateway type and the VPN type. Route-based refers to dynamic routing and policy-based refers to static routing.
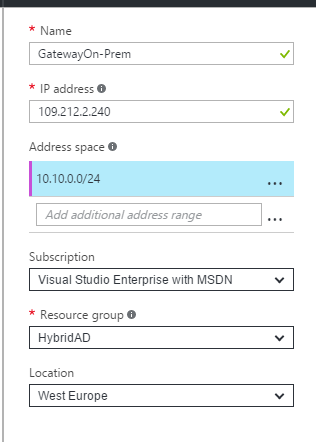
Once the creation of the virtual network gateway is running, open again the marketplace and this time I select local network gateway.

Specify the name, the public IP address of your datacenter and the local address spaces.
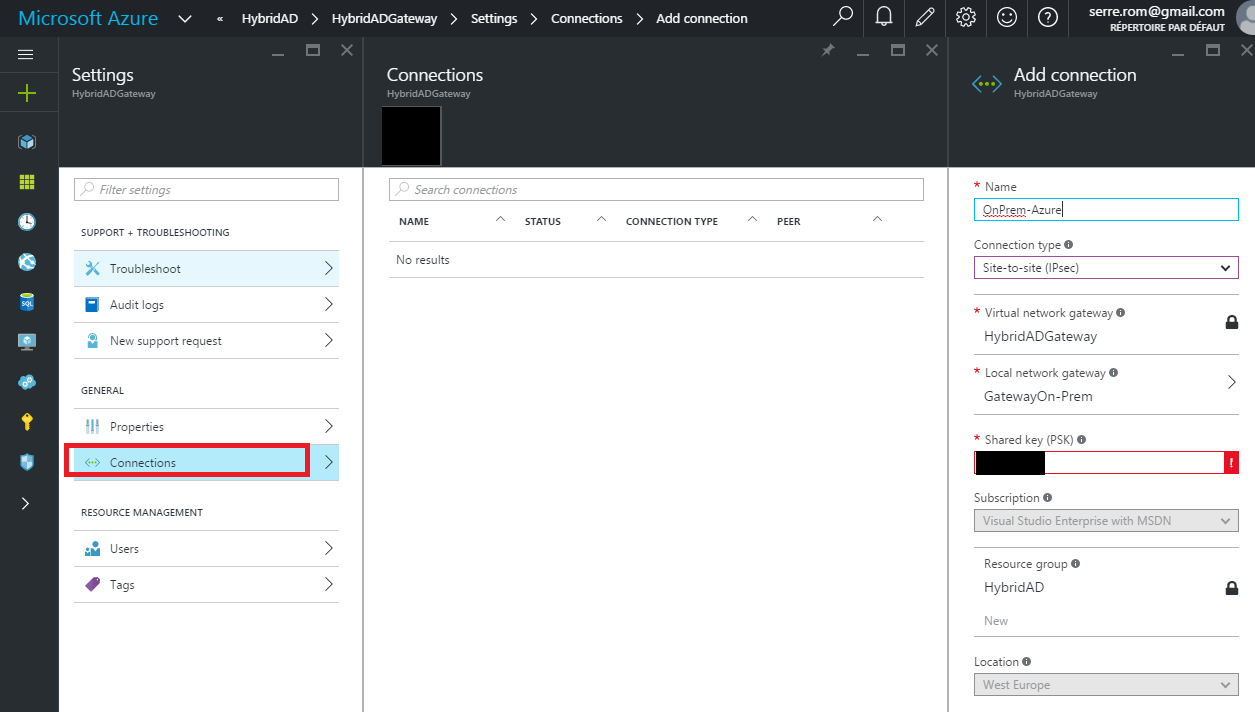
Now that both gateways are registered, we can create the connection. Open the virtual network gateway settings. Select connections and click on Add. Specify the name of this connection and then select Site-To-Site (IPSec). Specify your virtual network gateway and the local network gateway. Then give a shared key.
Now you have to configure your gateway. You can refer to this documentation about gateways. There are validated gateway and the others. In my side I have an Ubiquiti Edgerouter ER3-Lite. This device is not in the validated gateway. I have run this configuration in my gateway:
set vpn ipsec disable-uniqreqids
set vpn ipsec esp-group esp-edgemax
set vpn ipsec esp-group esp-edgemax lifetime 3600
set vpn ipsec esp-group esp-edgemax pfs disable
set vpn ipsec esp-group esp-edgemax mode tunnel
set vpn ipsec esp-group esp-edgemax proposal 1
set vpn ipsec esp-group esp-edgemax proposal 1 encryption aes256
set vpn ipsec esp-group esp-edgemax proposal 1 hash sha1
set vpn ipsec esp-group esp-edgemax compression disable
set vpn ipsec ike-group ike-edgemax
set vpn ipsec ike-group ike-edgemax lifetime 28800
set vpn ipsec ike-group ike-edgemax proposal 1
set vpn ipsec ike-group ike-edgemax proposal 1 dh-group 2
set vpn ipsec ike-group ike-edgemax proposal 1 encryption aes256
set vpn ipsec ike-group ike-edgemax proposal 1 hash sha1
set vpn ipsec ipsec-interfaces interface pppoe0
set vpn ipsec logging log-modes all
set vpn ipsec nat-traversal enable
set vpn ipsec site-to-site peer 13.94.252.98
set vpn ipsec site-to-site peer 13.94.252.98 local-address any
set vpn ipsec site-to-site peer 13.94.252.98 authentication mode pre-shared-secret
set vpn ipsec site-to-site peer 13.94.252.98 authentication pre-shared-secret <Secret>
set vpn ipsec site-to-site peer 13.94.252.98 connection-type initiate
set vpn ipsec site-to-site peer 13.94.252.98 default-esp-group esp-edgemax
set vpn ipsec site-to-site peer 13.94.252.98 ike-group ike-edgemax
set vpn ipsec site-to-site peer 13.94.252.98 tunnel 1
set vpn ipsec site-to-site peer 13.94.252.98 tunnel 1 esp-group esp-edgemax
set vpn ipsec site-to-site peer 13.94.252.98 tunnel 1 local prefix 10.10.0.0/24
set vpn ipsec site-to-site peer 13.94.252.98 tunnel 1 remote prefix 10.11.0.0/24
set vpn ipsec site-to-site peer 13.94.252.98 tunnel 1 allow-nat-networks disable
set vpn ipsec site-to-site peer 13.94.252.98 tunnel 1 allow-public-networks disable
commit
save
Once the connection is established, the status of the connection is connected.
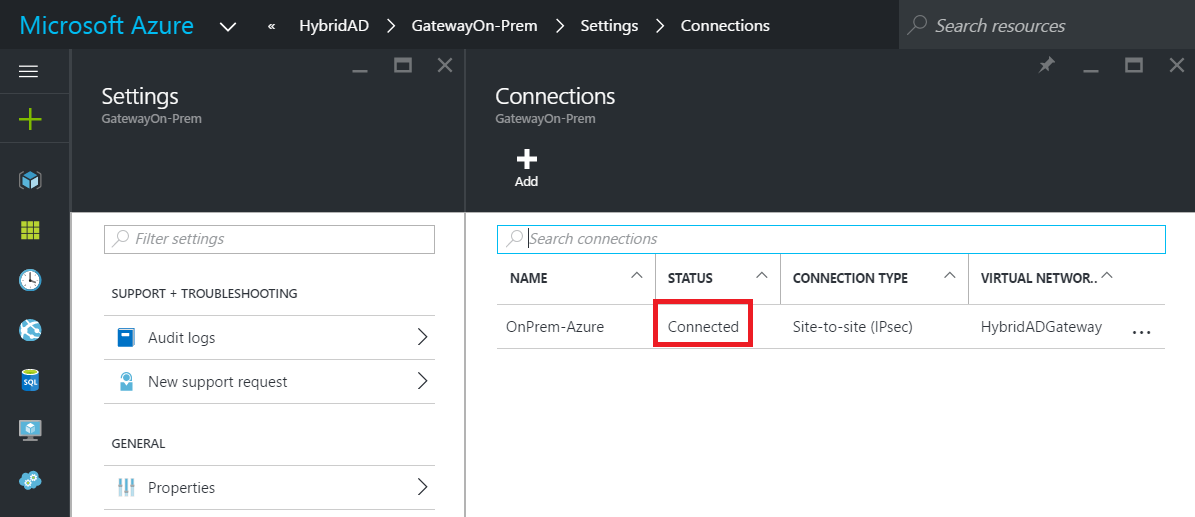
On the gateway side, I have the below status:

Prepare your Active Directory
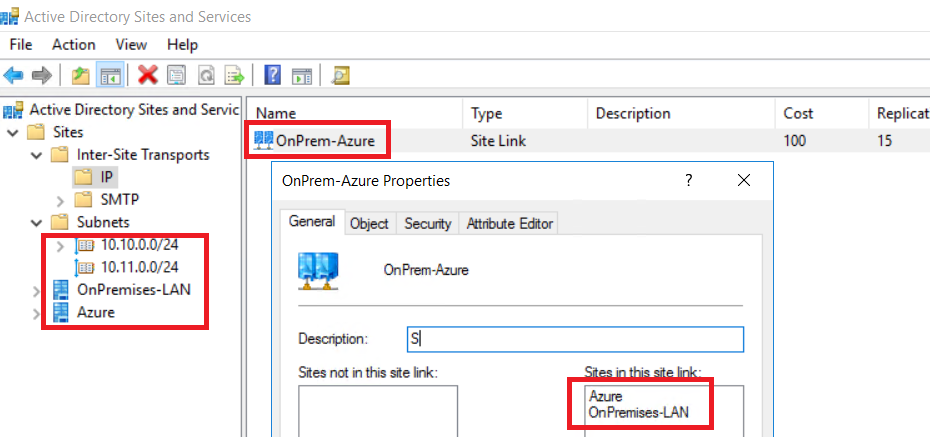
Now that connection is established, we can configure the Active Directory. First I create a new site called Azure. Then I associate the 10.11.0.0/24 subnet to this site. To finish, I create a site link called OnPrem-Azure. In this way, VMs in the subnet 10.11.0.0/24 will request domain controllers in this network (except when they are both down).
Deploy domain controllers in Azure
Temporarily, I set the DNS Servers to my both local domain controllers. To change the DNS Settings, open the virtual network settings and select DNS Servers. Once the DNS Servers are set, reboot your Azure VMs in order to they take the new configuration.

Then install and configure the Active Directory Domain Service role. For that, I use a PowerShell script:
Install-WindowsFeature AD-Domain-Services
Import-Module ADDSDeployment
Install-ADDSDomainController
-NoGlobalCatalog:$false
-CreateDnsDelegation:$false
-Credential (Get-Credential)
-CriticalReplicationOnly:$false
-DatabasePath “E:\NTDS”
-DomainName “int.HomeCloud.net”
-InstallDns:$true
-LogPath “E:\NTFS”
-NoRebootOnCompletion:$false
-SiteName “Default-First-Site-Name”
-SysvolPath “E:\SYSVOL”
-Force:$true
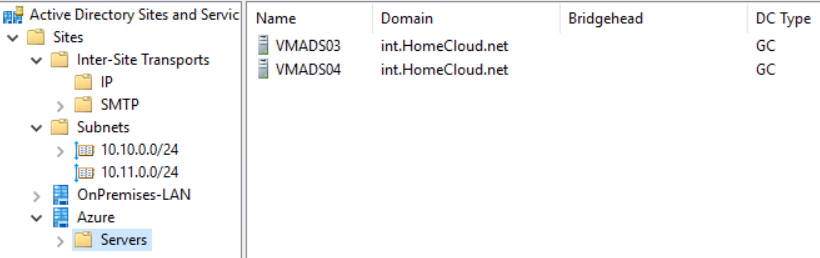
Once the servers have rebooted, you can refresh the sites and services view. In Azure site, you should have two others domain controllers.
Final modification
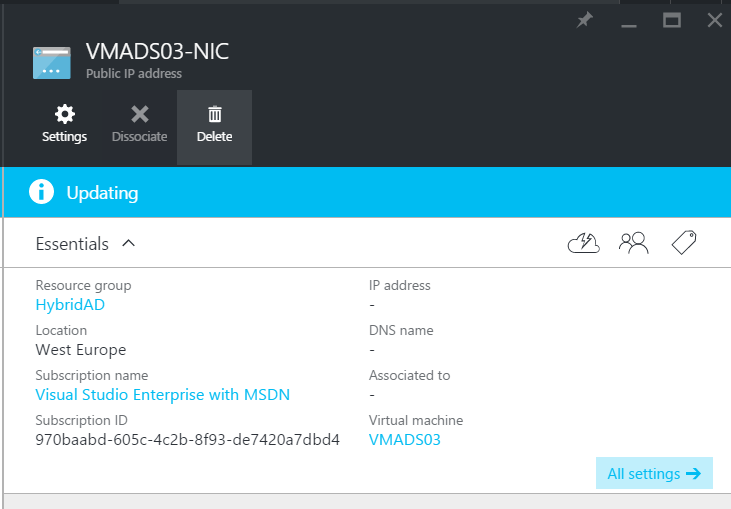
Now that the Azure domain controllers can be managed locally through the site-to-site connection, I remove the public IP. I don’t want these VMs are accessible from the Internet.
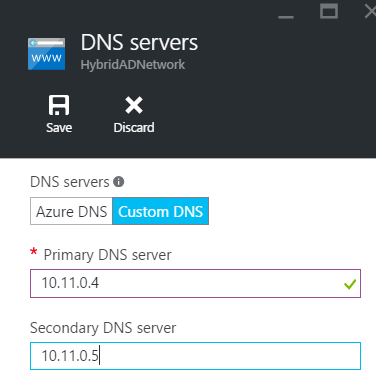
Then I changed the DNS Servers settings to the final configuration. I specify both Azure domain controllers IP addresses. In this way, Azure VMs will contact Azure domain controllers for DNS requests.
Test
To test my solution, I deploy a new virtual machine in Azure by using this script:
# Set values for existing resource group and storage account names
$rgName=”HybridAD”
$locName=”West Europe”
$saName=”hybridadstorage”
# Ask for VM credential
$cred=Get-Credential -Message “Type the name and password of the local administrator account.”
# Set the existing virtual network and subnet index
$vnetName=”HybridADNetwork”
$subnetIndex=0
$vnet=Get-AzureRMVirtualNetwork -Name $vnetName -ResourceGroupName $rgName
# Create the NIC.
$nicName=”VMRDS02-NIC”
$pip=New-AzureRmPublicIpAddress -Name $nicName -ResourceGroupName $rgName -Location $locName -AllocationMethod Dynamic
$nic=New-AzureRmNetworkInterface -Name $nicName -ResourceGroupName $rgName -Location $locName -SubnetId $vnet.Subnets[$subnetIndex].Id -PublicIpAddressId $pip.Id
# Specify the name, size, and existing availability set
$vmName=”VMRDS02″
$vmSize=”Basic_A1″
$vm=New-AzureRmVMConfig -VMName $vmName -VMSize $vmSize
# Specify the image and local administrator account, and then add the NIC
$pubName=”MicrosoftWindowsServer”
$offerName=”WindowsServer”
$skuName=”2012-R2-Datacenter”
$vm=Set-AzureRmVMOperatingSystem -VM $vm -Windows -ComputerName $vmName -Credential $cred -ProvisionVMAgent -EnableAutoUpdate
$vm=Set-AzureRmVMSourceImage -VM $vm -PublisherName $pubName -Offer $offerName -Skus $skuName -Version “latest”
$vm=Add-AzureRmVMNetworkInterface -VM $vm -Id $nic.Id
# Specify the OS disk name and create the VM
$diskName=”OSDisk”
$storageAcc=Get-AzureRmStorageAccount -ResourceGroupName $rgName -Name $saName
$osDiskUri=$storageAcc.PrimaryEndpoints.Blob.ToString() + “vhds/” + $vmName + $diskName + “.vhd”
$vm=Set-AzureRmVMOSDisk -VM $vm -Name $diskName -VhdUri $osDiskUri -CreateOption fromImage
New-AzureRmVM -ResourceGroupName $rgName -Location $locName -VM $vm
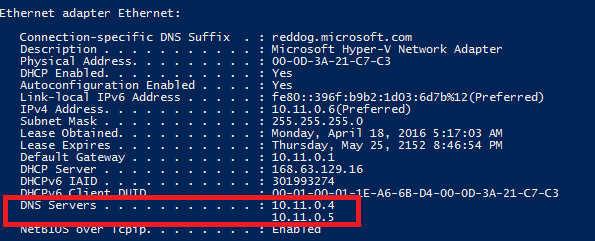
Then I connect to this server to open a PowerShell session. I run ipconfig to check the dns servers configuration.
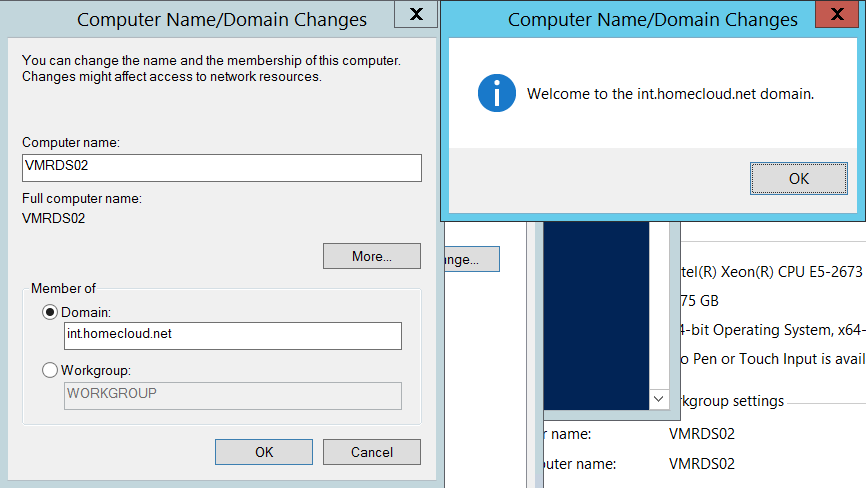
Now I join the Active Directory.
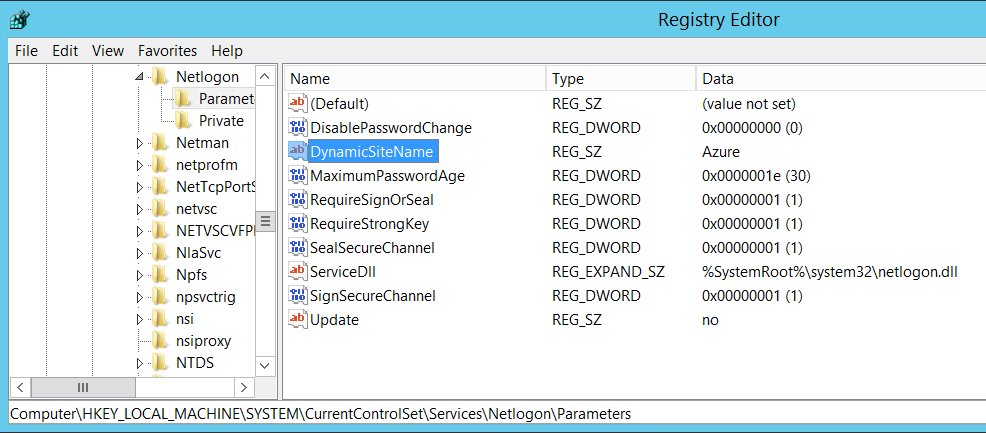
It’s working but now I have to check if the server requests an Azure domain controller. I open the below registry key to check the VM current AD site. In the below example, my VM is mapped to the Azure AD site.
Conclusion
An Active Directory extended between On-Premise and Microsoft Azure rely on site-to-site VPN, either IPSec or ExpressRoute. Once the connectivity between both locations is established, you have just to create an Active Directory site, subnet and link. Depending on your VPN throughput, you can increase or decrease the replication frequency. If you have a high speed and low latency link such as express route, you can replicate once changes have occurred as two domain controllers in the same site. Active Directory is often a basic service, so it is convenient to install domain controllers at the closest location of the domain machine (also in Azure).
