

Introduction
Applications that are deployed in Microsoft Azure often comprise different but related cloud resources, such as virtual machines, web applications, SQL databases, virtual networks among others. Before the introduction of Azure Resource Manager (Azure V2), it was necessary to define and provision these resources imperatively. However, Azure Resource Manager gives you the ability to define and provision these resources with their configuration and associated parameters declaratively in a JavaScript Object Notation (JSON) template file, known as an Azure Resource Manager template.
In this series of three blog posts, we will show you how to create and deploy Infrastructure as a Service (IaaS) applications using Azure Resource Manager templates.
In this guide, we will explain the benefits of Azure Resource Manager and resource groups, then we will examine and analyze a number of Quick Start Azure Resource Manager templates that are available on GitHub. In the next post, we will create and configure a GitHub account, if you don’t already have one, to host a GitHub repository for a Quick Start template, and lastly we will examine Visual Studio Code integration with Git and push commits to a remote repository.
Azure Resource Manager Overview
The Service Management API in Azure V1, allows organizations to manage Azure resources, such as storage accounts, virtual machines, and virtual networks, as individual entities. The Service Management API model serves well, but it does not reflect the fact that these entities are often related and independent parts of a larger, single entity.
In contrast to the Azure Service Management API, the Azure Resource Manager API (Azure V2) allows organizations to deploy, manage, and monitor Azure resources as a single group. In addition to this benefit, Azure Resource Manager makes it possible to use declarative templates to define and provision resources in a deployment. Furthermore, organizations could implement Role-Based Access Controls (RBAC) to provide greater security. Using Azure Resource Manager, you would be able to apply tags to resources to organize them logically within the same subscription.
A significant and additional benefit is that by using Azure Resource Manager templates, you can start to realize an important goal of bringing the best of DevOps practices into the infrastructure by treating the infrastructure as code. Following this paradigm, organizations will be able to modularize its infrastructure into various components and then join or separate the constituent components as necessary in a highly automatable and scalable manner.
Requirements
The instructions described in this guide assume you are familiar with the new Azure portal, which is located at https://portal.azure.com. Some tasks are only available through the Azure classic portal, which is located at https://manage.windowsazure.com. There will be some need to switch back and forth between the two portals. Most of what we will be doing could also be done using the classic portal. However, for the sake of consistency and clarity, we will use the new Azure portal whenever is possible.
This guide requires a valid Azure subscription. It is strongly recommended to use an Azure free trial account or an Azure Pass.
The big news! Microsoft just announced a new free subscription called (Microsoft IT Pro Cloud Essentials) for IT Professionals. The goal is to give IT Pros the tools they need to train, test, and eventually implement private and public cloud solutions.
Microsoft IT Pro Cloud Essentials is a free annual subscription which includes cloud services, education, and support benefits. IT Pro Cloud Essentials provides IT Implementers with hands-on experience, targeted educational opportunities, and access to experts in areas that matter most to increase knowledge and create a path to career advancement.
For the full story, and to sign-up/sign-in to your subscription, go here:
http://itprocloudessentials.com
Use EITHER an Azure free trial, an Azure Pass or the new IT Pro Cloud Essentials subscription.
You need an Azure account ready if you want to follow along.
Objectives
During this post, we will cover the following topic:
- Understanding Azure Quick-Start templates and resource groups.
Understanding Azure Quick-Start templates and resource groups
A JavaScript Object Notation (JSON) template file is a text file that contains descriptions of the resources, configuration code and extensions. JSON templates can be used and run multiple times without changing the outcome beyond initial deployment. A consequence of this characteristic is that templates can be used to upgrade applications, for example, by scaling out applications with additional virtual machines. You modify the template to include the specifications for the additional virtual machines. When you deploy the template, Azure Resource Manager will recognize the resources that have previously been deployed and create only the resources that have been added.
Another advantage of template files is that they can be parameterized. This simplifies orchestration and deployment of applications because the parameterization allows you to reuse templates to create deployments with different configurations based on the parameters you define in the JSON template and that you specify at run time.
Once you create a JSON-based template, you can deploy the resources described in the template by using the Azure portal or using Windows PowerShell commands. An advantage of using Windows PowerShell commands is that you can include them in a Windows PowerShell script that provides additional automation.
When you execute the template, the resources are provisioned to a new or existing Azure resource group. An Azure resource group is a collection of related cloud resources that you can manage as a single entity. Resource groups allow you to start, stop, or delete all resources in a group at once, to apply Role-Based Access Control rules to provide more granular security permissions on resources, to audit operations within the resource as a whole, and to enable better tracking through the use of metadata tags.
One way to think of Azure resource groups is to consider them as containers where you place logically related resources. For example, a resource group might contain an Internet-facing website, a back-end SQL database, one or more virtual networks, and a storage account for additional assets. Alternatively, you could create a separate resource group for your back-end SQL database as this component is likely to have a different lifecycle than your front-end web applications. Therefore, when considering whether resources should be placed in the same or different resource group, you should also keep in mind the lifecycle of those resources, and group resources accordingly.
JSON templates simply provide a different way of defining the same types of resources that you may be familiar with using the Azure classic deployment model. For example, to create a new virtual machine using the Azure Service Management mode, you would specify the image name, the virtual machine name, the size, the administrative account, the password credential, and other values. When deploying resources using JSON templates, you specify the same information, but in a different format.
It is rarely necessary to create a JSON template from scratch. Microsoft maintains a large and growing library of community-contributed Azure templates on GitHub that you can leverage to learn about JSON templates and to deploy your own applications.
In the following steps, we will view the Quick-Start templates that are available on GitHub and examine one of them in depth.
1 – Open your browser, and then navigate to https://github.com/Azure/azure-quickstart-templates. If you are new to GitHub. GitHub is a repository service based on Git that provides source control management (SCM) and revision control. GitHub expands on the functionality of the command-line based Git by providing a GUI and collaboration features.
2- On the Azure Quick-Start Templates page, spend a few moments examining the titles and scrolling down the page. The templates that have a prefix of 101 are simple templates; templates that have a prefix of 201 or 301 are more advanced and complex templates.
3- Scroll down the page, locate, and then double-click 101-vm-simple-windows
As you can see in the following screenshot, the folder contains 4 files:

- The README.md is an html file that contains the description and the button that you can click to deploy the template to an Azure subscription.
- The azuredeploy.json file is the main file used to deploy the cloud resources.
- The azuredeploy.parameters.json is the file where you can provide values for the parameters defined in the azuredeploy.json file and pass them in at execution time.
- The metadata.json file provides additional data about the deploy template.
4- Click azuredeploy.json. Review the screenshot of the JSON file. 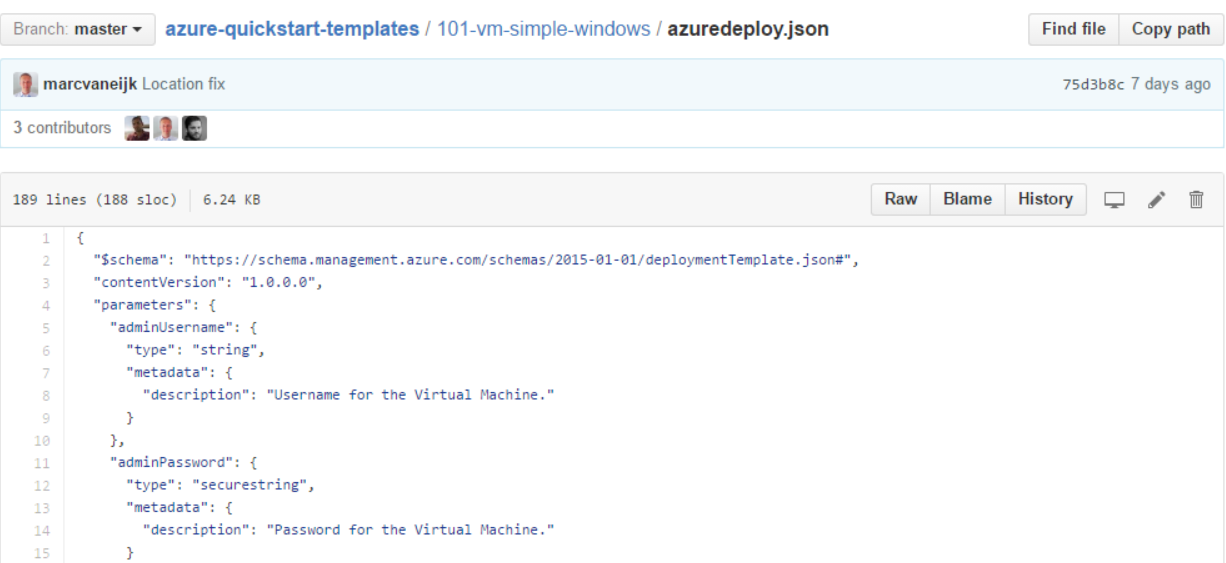
5- At the top of the file, note the first line that references a JSON schema. The schema reference is used by intelligent JSON clients to determine the schema that is applicable to the JSON file and to provide additional functionality such as autocomplete and IntelliSense. IntelliSense is the general term for a number of features: List Members, Parameter Info, Quick Info, and Complete Word.
6- Note the Parameters key. The value for the Parameters key is an array of parameter objects that represent the dynamic input for the JSON template.
7- In the parameters section, note the “adminPassword” parameter, and note the “type” value “securestring”. “Securestring” is a special data type that is used to ensure that the value is not persisted anywhere in the Azure platform. This ensures that sensitive information, such as passwords, are not displayed. 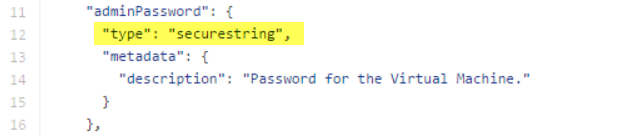
8- Scroll down to view the WindowsOSVersion parameter object. When you execute the JSON template, you will be prompted for any parameter values that are missing from the input, unless you have specified a default value. 
9- Scroll down to the variables section that begins at around line 36. Variables, in general, represent static values that are already present in the template, in contrast to parameter values which are passed in at execution time. 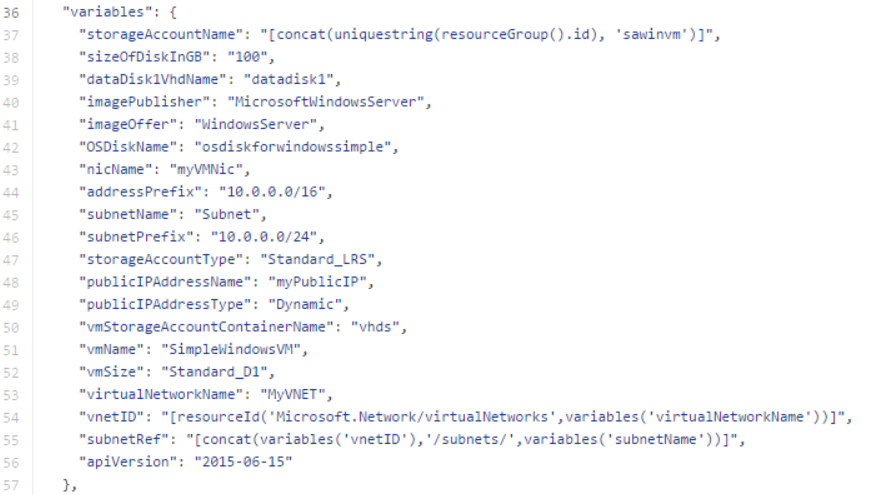
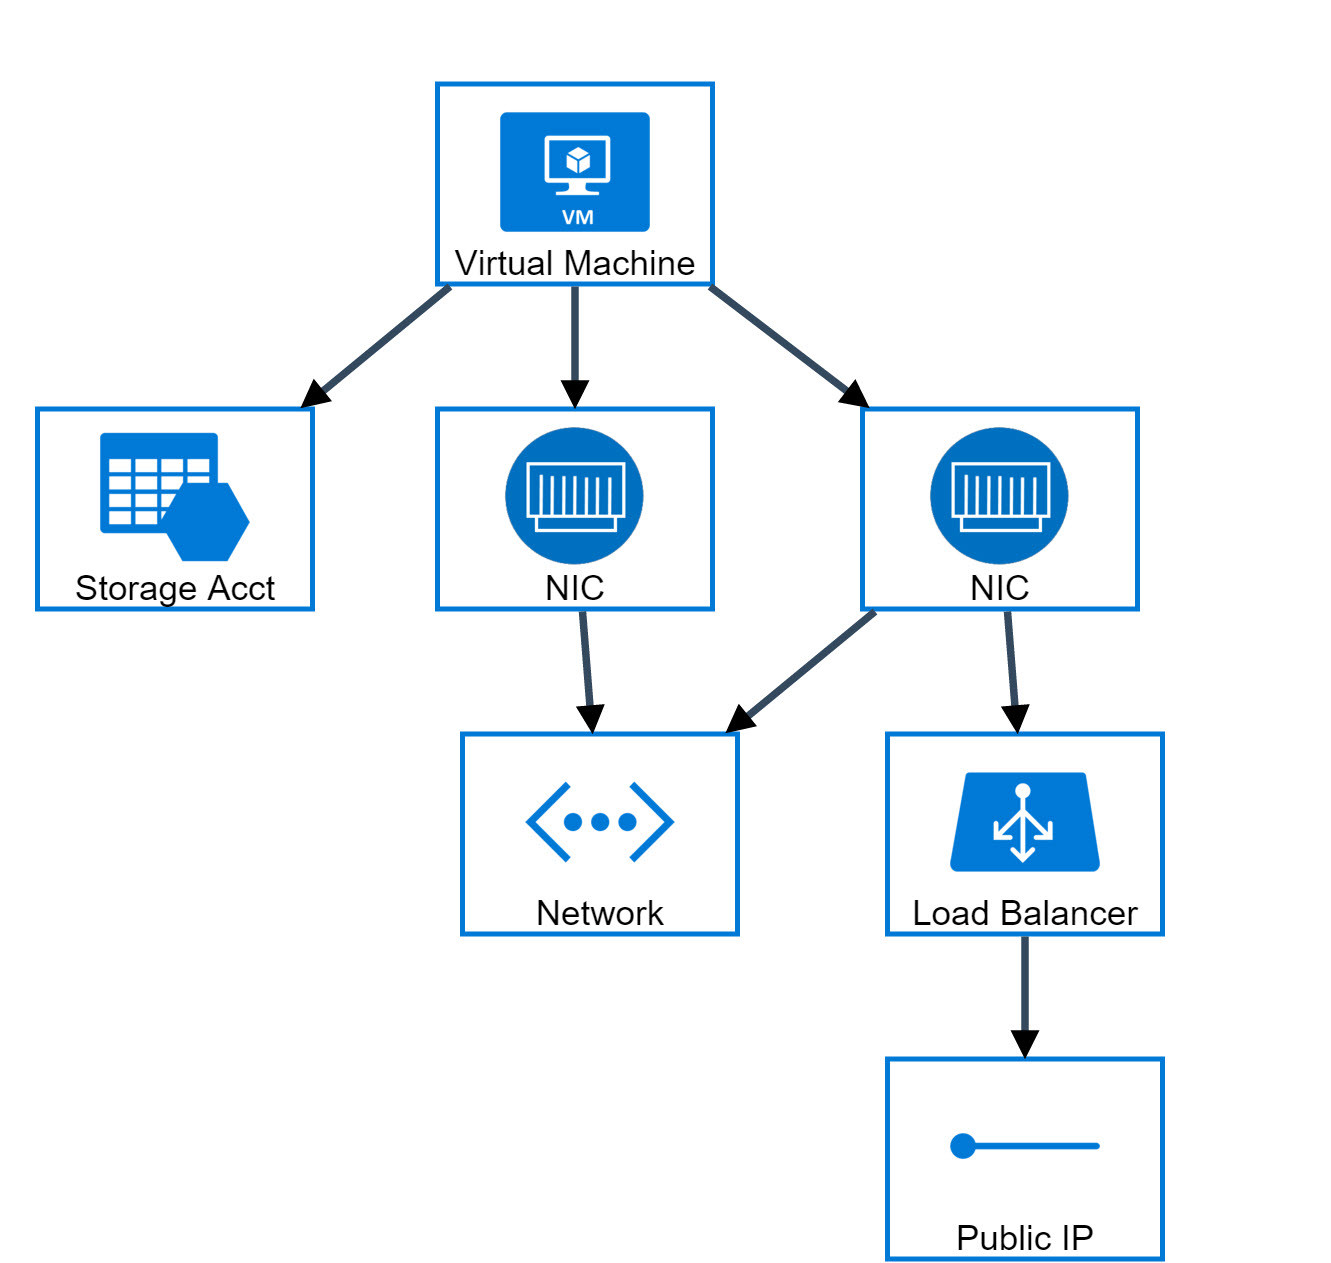
10- Scroll down to the resources section that begins at around line 58. In the resources array section, you define the resources that you wish to deploy or update. Each resource must include a type, name, and apiVersion. The type value is the namespace of the resource provider and the supported resource type. The value for the type is a substring of the URL you would use if you wanted to create a resource, such as a storage account, against the Azure REST (representational state transfer) API (application programming interface). When the template is deployed, the template engine makes the same HTTP put calls that would be made if you were directly interacting with the API. 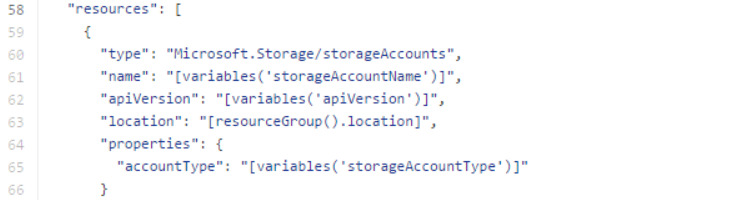
11- Scroll down to the beginning of the virtual machine resource definition, which begins at around line 128. As you can see in the following screenshot, the “dependsOn” key/value pair. Before the virtual machine can be created, the storage account and the network interface, which in turn has dependencies of its own (see lines 105-111), must exist.

12- Click the back button on your browser to return to the previous page.
13- On the 101-vm-simple-windows page, click Deploy to Azure.

14- On the Microsoft Azure sign-in page, enter the email address and password associated with your subscription, and then click Sign in.
Note that the Parameters blade provides fields for text input. In the case of the WINDOWSOSVERSION (string) parameter, note the presence of a default value and a drop-list of allowed values. 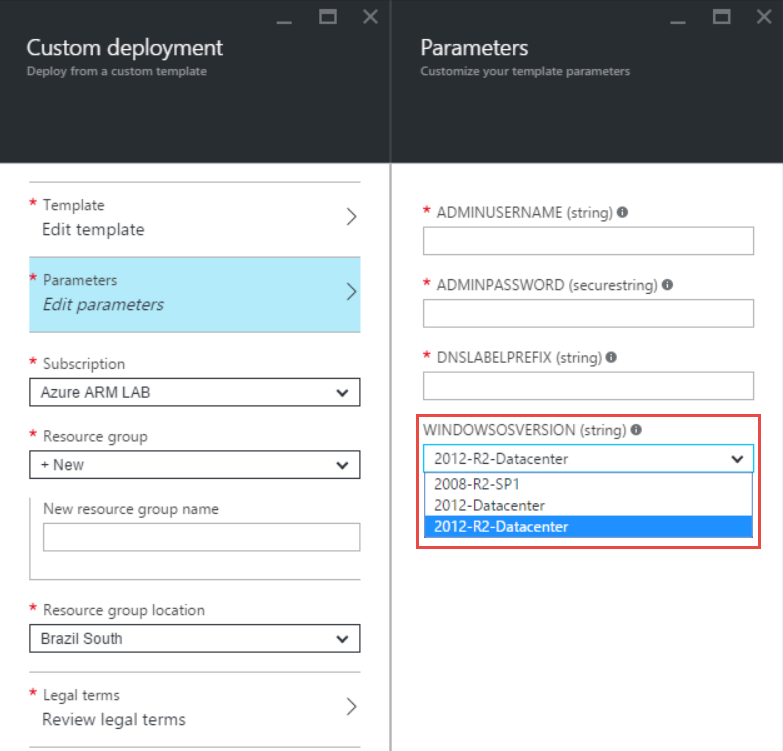
15- On the Custom deployment blade, click Edit template. You can edit the template before deploying it, for example, to change variable names or modify resources that the template describes for deployment. 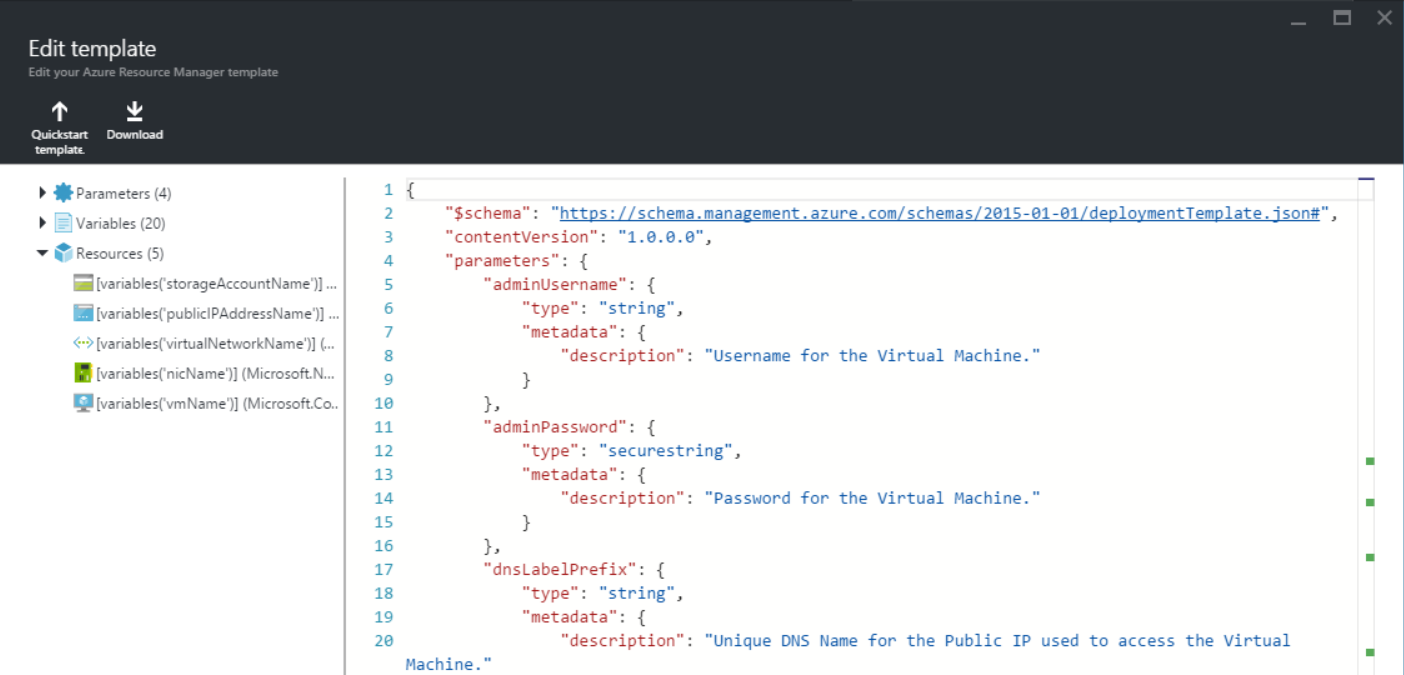
16- Close the Edit template blade.
17- On the Custom deployment blade, in Resource group, click or create +New.
18- In Create a new resource group, type Test-JSON.
19- Click Resource group location. Review the locations, and then close the Location blade.
20- Close the Custom deployment blade. We are not going to deploy the template at this time. Rather, we will modify the template in the next post and then explore other ways of deploying the template.
21- If prompted by a warning indicating your unsaved edits will be discarded, click OK.
Summary
In this post, we explained the benefits of Azure Resource Manager and resource groups in Azure V2 versus the Service Management API in Azure V1, then we looked in depth at JavaScript Object Notation (JSON) Quick Start templates.
Until then… see you in Part 2.
Thanks for reading.
